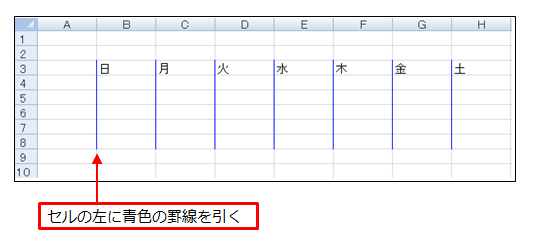
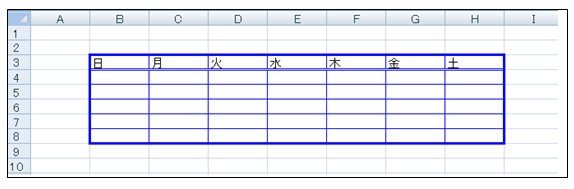
ワークシートに、次のような「一ヶ月分のスケジュール表」を作ります。
ここでは、セルに「罫線」を引いて、表を作り罫線「太さや線の色」を変更する方法を説明します。
また、「セルの背景色」の変更方法を説明します。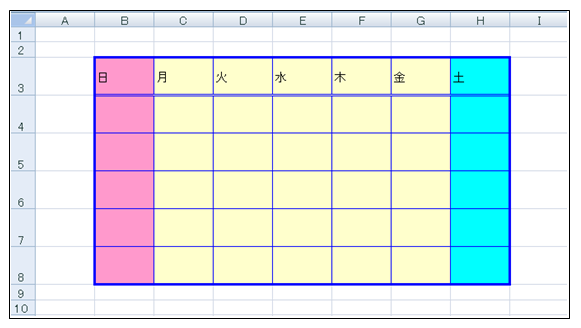
Sub サンプル0045()

  Dim WS1 As Object

  Set WS1 = Worksheets("sheet1")

  With WS1
    .Range("B3") = "日"
    .Range("B3").Select
  End With

  'B3からH3までオートフィルする
  Selection.AutoFill Destination:=Range("B3:H3")

  '罫線を引く、線の太さ、色を設定する
  WS1.Range("B3:H8").Select
  With Selection.Borders(xlLeft)
    .LineStyle = xlContinuous
    .Weight = xlThin
    .ColorIndex = 5
  End With
  With Selection.Borders(xlTop)
    .LineStyle = xlContinuous
    .Weight = xlThin
    .ColorIndex = 5
  End With
  With Selection.Borders(xlBottom)
    .LineStyle = xlContinuous
    .Weight = xlThin
    .ColorIndex = 5
  End With
  With Selection.Borders(xlRight)
    .LineStyle = xlContinuous
    .Weight = xlThin
    .ColorIndex = 5
  End With

  '下線を二重線に変更する
  Range("B3:H3").Select
  Selection.Borders(xlBottom).LineStyle = xlDouble
  WS1.Range("B3:H8").BorderAround Weight:=xlThick, ColorIndex:=5, LineStyle:=xlContinuous
  WS1.Range("A3:A8").RowHeight = 35

  '曜日のセルを塗りつぶす
  With WS1
    .Range("B3:B8").Interior.ColorIndex = 38
    .Range("C3:G8").Interior.ColorIndex = 19
    .Range("H3:H8").Interior.ColorIndex = 8
    .Range("B4").Activate
  End With

End Subマクロでスケジュール表を作るVBAのコード
■ コード内を「Wクリック」で選択できます。[code] Sub サンプル0045() Dim WS1 As Object Set WS1 = Worksheets(“sheet1”) With WS1 .Range(“B3”) = “日” .Range(“B3”).Select End With ’B3からH3までオートフィルする Selection.AutoFill Destination:=Range(“B3:H3”) ’罫線を引く、線の太さ、色を設定する WS1.Range(“B3:H8”).Select With Selection.Borders(xlLeft) .LineStyle = xlContinuous .Weight = xlThin .ColorIndex = 5 End With With Selection.Borders(xlTop) .LineStyle = xlContinuous .Weight = xlThin .ColorIndex = 5 End With With Selection.Borders(xlBottom) .LineStyle = xlContinuous .Weight = xlThin .ColorIndex = 5 End With With Selection.Borders(xlRight) .LineStyle = xlContinuous .Weight = xlThin .ColorIndex = 5 End With ’下線を二重線に変更する Range(“B3:H3”).Select Selection.Borders(xlBottom).LineStyle = xlDouble WS1.Range(“B3:H8”).BorderAround Weight:=xlThick, ColorIndex:=5, LineStyle:=xlContinuous WS1.Range(“A3:A8”).RowHeight = 35 ’曜日のセルを塗りつぶす With WS1 .Range(“B3:B8”).Interior.ColorIndex = 38 .Range(“C3:G8”).Interior.ColorIndex = 19 .Range(“H3:H8”).Interior.ColorIndex = 8 .Range(“B4”).Activate End With End Sub [/code]
マクロの記述方法
1.デスクトップに作成した「確認用マクロのコピー」を開いて、「Visual Basic」をクリックします。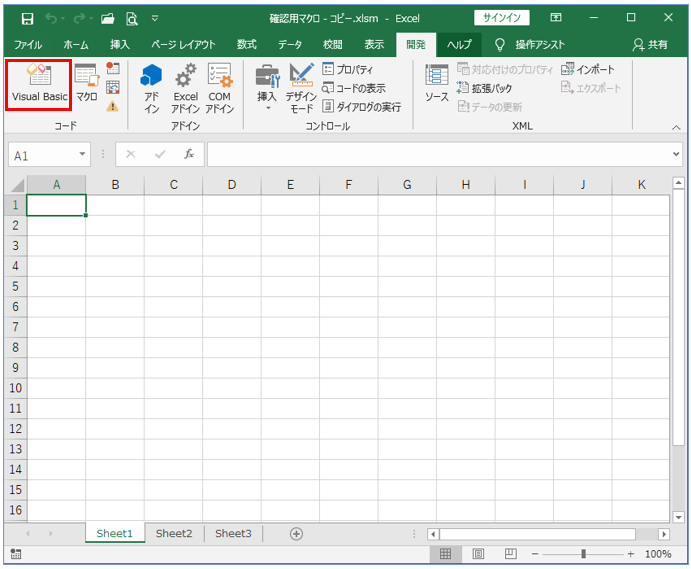
2.「Visual Basic」の画面で「Module1」を開きます。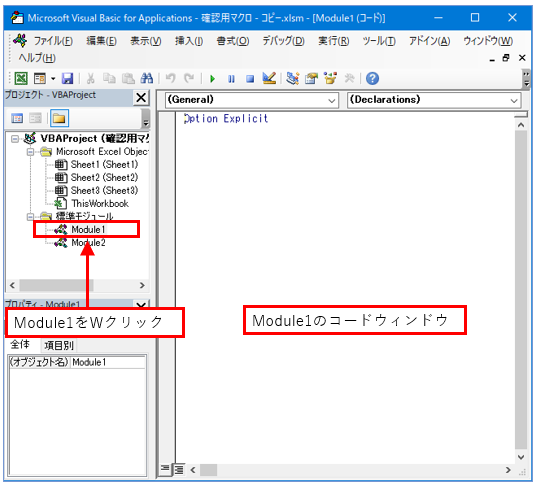
3.サンプル0045のコードをコピーして、「Module1のコードウィンドウ」に貼り付けます。
4.このマクロを実行すると、図のようなマクロが実行されます。
コードの説明
この日程表は、ごく簡単なものです。
B列にから列方向に日曜から土曜までの曜日が入力されます。
一ヶ月分のマスを作り、予定を書き込めるようにしたものです。
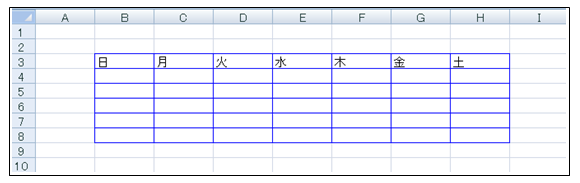
曜日をオートフィルで入力し、罫線で枠線を指定します。
各曜日のセルは、土日と平日で背景色を変えています。
1. Setステートメントを使って、ワークシート「Sheet1」のオブジェクト名を変数「WS1」に格納します。
Set WS1 = Worksheets(“sheet1”)
2.セル「B3」に文字「日」を代入して選択します。
次にオートフィルが実行されて、セル「H3」まで「曜日」が入力されます。
With WS1
.Range(“B3”) = “日”
.Range(“B3”).Select
End With
Selection.AutoFill Destination:=Range(“B3:H3”)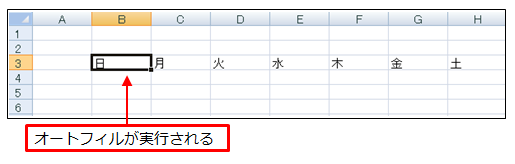
3.次に罫線を引く範囲としてセル「B3」からセル「H8」を選択します。
WS1.Range(“B3:H8”).Select
4.Selectionプロパティで「現在選択している範囲」をオブジェクトに指定します。
セルに罫線を引くには、RangeオブジェクトのBordersプロパティで設定します。
●Bordersプロパティの定数
Borders(xlTop)-セルの上側
Borders(xlRight)-セルの右側
Borders(xlBottom)-セルの下側
Borders(xlLeft)-セルの左側
Borders(xlDiagonalDown)-斜線(右下がり)
Borders(xlDiagonalUp)-斜線(右上がり)
Borders(xlInsideHorizontal)-セル範囲の真ん中の水平線
Borders(xlInsideVertical)-セル範囲の真ん中の垂直線
5.セルの左側に罫線を引く設定をします。
With Selection.Borders(xlLeft)
6.罫線を引く場所を設定したら
LineStyleプロパティ\(\cdots\)線の種類
Weightプロパティ\(\cdots\)線の太さ
ColorIndexプロパティ\(\cdots\)線の色 を設定します。
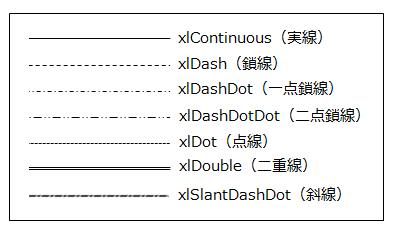
7.LineStyleプロパティ(線の種類)
ラインスタイル「実線」
.LineStyle = xlContinuous
●LineStyleプロパティの定数
xlContinuous-実線
xlDash-鎖線
xlDashDot-一点鎖線
xlDashDotDot-二点鎖線
xlDot-点線
xlDouble-二重線
xlSlantDashDot-斜線
xlLineStyleNone-線なし
8.Weightプロパティ(線の太さ)
ウェイト「細線」
.Weight = xlThin
●Weightプロパティの定数
xlHairline-極細線
xlThin-細線
xlMedium-中太線
xlThick-太線
9.ColorIndexプロパティ(線の色)
カラーインデックス「青色」
.ColorIndex = 5
10.セルの左側の罫線を「実線、普通の太さ、青色」に設定します。
With Selection.Borders(xlLeft)
.LineStyle=xlContinuous
.Weight=xlThin
.ColorIndex=5
End With
11.同じように、セルの上(xlTop)、下(xlBottom)、右(xlRight)にも設定します。
With Selection.Borders(xlTop)
.LineStyle=xlContinuous
.Weight=xlThin
.ColorIndex=5
End With
With Selection.Borders(xlBottom)
.LineStyle=xlContinuous
.Weight=xlThin
.ColorIndex=5
End With
With Selection.Borders(xlRight)
.LineStyle=xlContinuous
.Weight=xlThin
.ColorIndex=5
End With
背景の設定
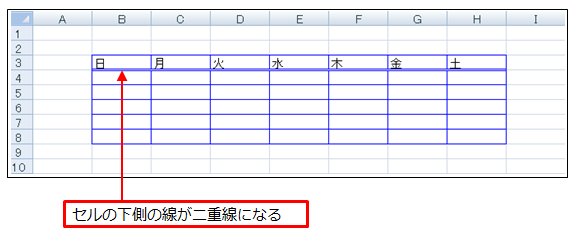
1.曜日のセルを選択し、セルの下側の罫線を「二重線」にする。
Range(“B3:H3”).Select
Selection.Borders(xlBottom).LineStyle=xlDouble
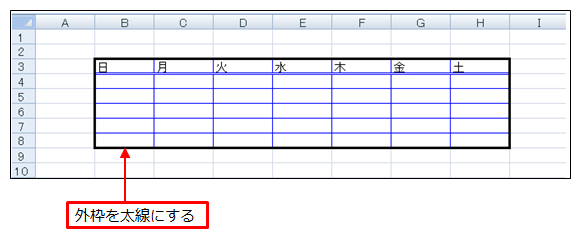
2.セルの「B3からH8」の範囲を指定して、外枠を「太線」で囲みます。
WS1.Range(“B3:H8”).BorderAround Weight:=xlThick
BorderAround の書式は次のようになる。
Range.BorderAround(Linestyle,Weight,ColorIndex,Color)
3.外枠を「BorderAround」メソッドを使って、「青色の太線」に設定します。
WS1.Range(“B3:H8”).BorderAround Weight:=xlThick, ColorIndex:=5, LineStyle:=xlContinuous
4.次に「セルA3からセルA8」の高さを設定します。
WS1.Range(“A3:A8”).RowHeight = 35
5.そして、日曜日の色をピンク色に、平日のセルをクリーム色に、土曜日のセルの色を水色に塗りつぶします。
With WS1
.Range(“B3:B8”).Interior.ColorIndex=38
.Range(“C3:G8”).Interior.ColorIndex=19
.Range(“H3:H8”).Interior.ColorIndex=8
.Range(“B4”).Activate
End With
最後に、ActivateメソッドでセルB4をアクティブにしておきます。